 |
piphoto3D A simple and multiplatform 3D pictures viewer. |
 |
Display your 3D pictures from your Raspberry Pi or other computer using various 3D modes | ||||||||||||||||||||||||||||||||||||||||||||||||||||||||||||||||||||||||||||||||||||||||||||||||||||
|
|
|||||||||||||||||||||||||||||||||||||||||||||||||||||||||||||||||||||||||||||||||||||||||||||||||||||
| Installation: Download the "jar" file below and copy it in a folder of your choice. The application will need a Java 6 (or better) Java runtime installed on the computer. | |||||||||||||||||||||||||||||||||||||||||||||||||||||||||||||||||||||||||||||||||||||||||||||||||||||
|
Help file: piphoto3D_usage_en.txt |
|||||||||||||||||||||||||||||||||||||||||||||||||||||||||||||||||||||||||||||||||||||||||||||||||||||
Supported 3D modes- Side-by-side: the left and right images of the stereoscopic pair are placed side by side.- Side-by-side ½ width: the left and right images of the stereoscopic pair are placed side by side but are horizontally compressed by half. This mode is compatible with 3D TV HDMI 1.4. - Top-and-bottom ½ height: the left and right images of the stereoscopic pair are placed on top of each other but are vertically compressed by half. This mode is compatible with 3D TV HDMI 1.4. - Anaglyph Red-Cyan: to be used with anaglyph glasses with red-cyan lenses. - Anaglyph Yellow-Blue: to be used with anaglyph glasses with yellow-blue lenses. - Anaglyph Green-Magenta: to be used with anaglyph glasses with green-magenta lenses. - Horizontally interlaced: the two images are interlaced row by row. - Vertically interlaced: the two images are interlaced column by column. - 2D: only one side of the 3D picture is displayed. How to startFor instance under Windows:
D:\workspace\piphoto3d>java -versionor with Linux :
pi@raspberrypi4:~ $ java -versionjava -jar /home/pi/java-pi/piphoto3d.jar -folder=?Note: replace /home/pi/java-pi/ with the path to the folder where the application has been downloaded. The application starts and displays a windows allowing to select the folder where the 3D pictures are located. Select the folder and click the Open button, the first image will be displayed full-screen in half-width side-by-side mode (suitable for 3DTV). To select another 3D mode, press the "M" key. To display the next picture, press the space bar or the right arrow key or click on the right part of the image. To display the pictures in automatic slideshow mode, press the "A" key. To exit the application, press the "Esc" key. - Start an automatic slideshow playing all the 3D pictures located in the "/home/pi/Images/3D/" folder: java -jar /home/pi/java-pi/piphoto3d.jar -folder=/home/pi/Images/3D/ -a- Index the 3D pictures located in the "/home/pi/Images/3D/" folder (and its subfolders) and create index files for each folder: java -jar /home/pi/java-pi/piphoto3d.jar -buildalbums=/home/pi/Images/3D/- Show a menu displaying the available albums found in the "/home/pi/Images/3D/" folder (indexed by the previous step): java -jar /home/pi/java-pi/piphoto3d.jar -albums=/home/pi/Images/3D/Application parameters
Commands during slideshow
Making picture albumsPictures are organised in thematic folders with an index filefor each folder. Using index files gives more control: - The pictures order can be specified by the user, - Information can be added to the pictures: date, location, comment,... It's a XML file named index.xml stored in the images folder.- Start the application specifying a folder of 3D pictures: For instance: java -jar piphoto3d.jar -folder=/home/pi/Images/3D/Paris- Press Ctrl+S, the index file is created in the pictures folder. - Exit the application then restart it asking to use the new index file: For instance: java -jar piphoto3d.jar -index=/home/pi/Images/3D/Paris/index.xml- Add information to the pictures: press the F7 key to open the Edit picture info window. 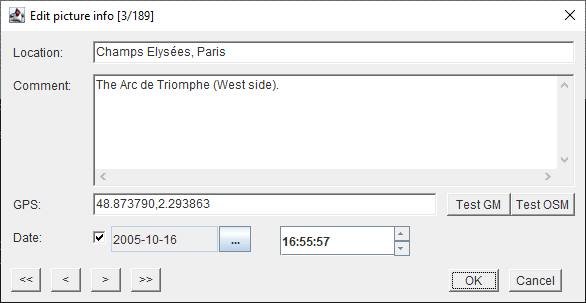 - There we can give the picture a title (or a location), add a comment, date and hour and specify a GPS position. - Do not forget to press Ctrl+S to record the modifications into the index! piphoto3D allows to navigate between images folder that have been previously indexed. These folders must be sub-folders of a master folder. The command: java -jar piphoto3d.jar -albums=<master folder> will start the application in albums mode and load the found index files.The application will then display the following menu allowing to select the folder to display: 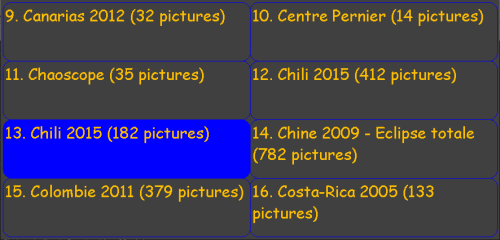 Use the Pg Up / Pg Dn keys to display the different pages of the menu. Notes- The application can read JPEG files (file extensions: .jpg, .jpe, .jpeg and .jps), PNG files and MPO files. - The depth positioning of comments is not possible in the interlaced modes nor the anaglyph modes. - With older versions of Java, you have to specify how much memory is allocated to the application, if an error message is displayed while loading an image, try to increase the memory using the following parameter: -Xmx300mFor instance: java -Xmx300m -jar /home/pi/java-pi/piphoto3d.jar -albums=/home/pi/Images/3D ...This nano computer is very slow (single core processor, few memory)! Going from an image to the next can take several seconds, it is therefore advised to resize beforehand the pictures to the size of the screen. The new Pi Zero V2 is fitted with a 4-core processor and should be a little faster. The Raspberry Pi 4 is fitted with two HDMI outputs making possible 3D projection with two videoprojectors from this device. Here are the parameters to using in this case: -screen=0,1 -m=0 -w=f#!/bin/bash # Sample script for using piphoto3d with a 3DTV # Explanation of the parameters used: # -albums=/home/pi/Images/3D : set album mode and specify the location of the root folder of the 3D images # -v=1 : display messages during the execution of the application # -b=202020 : backfround color # -x : process input images as crossed-eye rather than parallel # -d=10 : in automatic slideshow mode, set the delay between each picture # -t=C : position of the picture comment (here centered, at the bottom) # -m=1 : 3D mode (here half-width side by side) # -z=5 : depth position of the comments # -f=Arial,30 : font to use for the comments # -fm=Arial,28 : font to use for the menu used to select the albums # -menu=6,8 : size of the menu (here 6 columns x 8 rows) java -Xmx300m -jar /home/pi/java-pi/piphoto3d.jar -albums=/home/pi/Images/3D -v=1 -b=202020 -x -d=10 -t=C -m=1 -z=5 -f=Arial,36 -fm=Arial,28 -menu=6,8 Version history |
|||||||||||||||||||||||||||||||||||||||||||||||||||||||||||||||||||||||||||||||||||||||||||||||||||||